Posts

Showing posts with the label Swaps

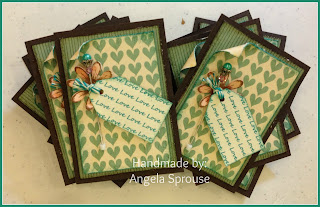
Fun with Artist Trading Cards!

Image
Hello again! Things have been crazy as always and I've neglected my poor blog. Just wanted to share a little ATC project with you today. These were made for a swap in Fancy Paper Crafters . The swap theme was Spring ATCs. I love all the flowers and butterflies that come out in spring so naturally, this is what I was going to do for my ATC. With the designer paper that I chose, I had so many color options! I looked through my cardstock to see what I had in my stash (I'm on a mission to use my stash rather buy anything!) that would match and came up with this coral/pinky color. I used a Stampin Up punch for the butterfly. The flower center is a simple jeweled brad by Recollections. The jewels on the butterfly are by Nicole's Design (I think!). I couldn't find my flower punches so I used my spellbinder dies and embossed them. Pretty easy peasy right :). Thanks for stopping by today!! Have a crafty day!

Swappity Swap!

Image
Hello again! Yes, I realize "swappity" isn't a word ... just roll with it :). Bringing you a couple of cards I made for swaps at  Fancy Paper Crafters . We swap stuff each month so check it out when ya get a chance! I just love how these two cards turned out. After trying various designs, this is what the final product is: So one of the things I usually do on my cards is ink the edges of white paper. I use a cut up yellow sponge (one of the circle sponges) which really lets the ink go on nicely. The flowers in the Fall card started out white and I just took some Tim Holtz distress ink and colored them to match my paper - I LOVE making my own custom colored things! Thanks for stopping by my little piece of craftiness :). Have a craftastic day!

Christmas in July

Image
Hello again! Yes, I realize it's no longer July :) .... I still wanted to share this card that I made for the Christmas in July Card Swap at Fancy Paper Crafters . I can't wait for Christmas!! I think it's wintertime that I'm ultimately longing for lol. The years that I'm actually put together enough to send out Christmas cards, I send out handmade cards. Some of my friends suggested we start our cards early this year and I jumped at the chance.   I found the triple layer stamping technique on Split Coast Stampers  and knew I had to try it out! Once I had my idea, I needed some design inspiration. What better place to turn than Pinterest (can you tell I'm addicted)?!   I have been on a kick lately of using black, red and white. However, I knew I didn't want to use black on this Christmas Card but liked the idea of sticking with the red and white. I found this gorgeous card on the PartiCraft blog (from Pinterest). She didn't provide directions...

Butterfly Love

Image
Hey y'all! I hope you are having a wonderful week so far. Tomorrow is hump day! (are you say "hump day" like they say in the commercial? LOL). I have a quick project to share with you today. I made these for an acetate swap at Fancy Paper Crafters . They were really quite simple! I don't have all the paper details as I used stuff from my stash (it was basic cardstock and I have no idea about the designer paper - sorry!).   I'm in love with these butterflies!!   I think it's the sparkly nature that has me dazzled lol. To make these pretties, I took a piece of Shimmer Sheetz by Elizabeth Craft Designs and embossed it with my Cuttlebug folder. I used my new Stampin Up! butterfly punch and punched out a bunch of these. The layers of paper on the front and inside were made using Spellbinders (those things are so convenient!). As much as I love my Cricut, sometimes I don't feel like dragging it out just to cut out some squares. The stamped image on f...

Fancy Folding!

Image
Hello again! I have a fun project to share with you today. This card was for a swap at Fancy Paper Crafters and the theme was "fancy folded cards". I scrap lifted the idea from  this tutorial at Splitcoast Stampers. I just love the tutorials they have over there! However, for mine, I wanted it to fit in a standard size envelope as I didn't feel like making my own. So, I altered the tutorial to make my finished card the standard A2 size (4 1/4" x 5 1/2"). This card is called a Center Step Card since it has a small step in the center. So, without further ado, here's what I came up with:   Want to know how I did it? It is really quite simple if you just take your time and get everything planned out. Here's a list of the product I used:   - Bazzill Cardstock: Juicy Pear - Papertrey Ink Cardstock: Raspberry Fizz - Generic Brown Cardstock - Generic White Cardstock - American Crafts Designer Paper: Amplified-Rock Opera - Stampin Up Ink: ...

Animal Card Cuteness

Image
Hello! Want to see something super cute? Well, you've stopped at the right blog today. This little card was made for a swap at Fancy Paper Crafters . The theme was "Animal Cards" and when I ran across this cute little stamp, I knew I had to use it! Here's what ya need to complete this card (it's really quite simple):     Supplies: - Cardstock (my patterned paper was from Basic Grey) - Embossing Folder (I used a daisy one from Darice) - Stamped Image (I believe this little guy was by Stampendous) - Copic Markers (love!!) - Embellishments (ribbon and bling on a roll)   Once you have all your supplies gathered, it's really just a matter of putting everything together. I used my Copic Markers to color in my image (no shading really due to the small stamp). One little trick I do for my layers is to measure everything. So, if my card base is measured 4 1/4 x 5 1/2 (it's the standard A2 card size), then I cut my first layer on my...

Fun with Rinchies!

Image
Hey y'all! Bringing you a little project today that I worked on at PMS Night (stands for Pizza, Munchies, Stamping/Scrapping) about a week ago. These little rinchies (which are round inchies) were made for the March swaps over at the Fancy Paper Crafters online craft group. If you've never participated in swaps before, check out the group as we do monthly swaps and have some really great gals participating. Anyway, here are my rinchies for this swap this month: For this project, all supplies came from Stampin Up!. If you need a rep, contact Mary Anne Magliaro ( http://www.stampinup.net/esuite/home/stampinmaryanne/ ). She is one awesome lady and has shared many fabulous projects with us. These stamps and punches are one of my newest purchases. I was hesitant at first due to their tiny size but they really worked out fabulous for this project. I had to make 9 sets of these little boogers which took FOREVER! I wanted to make two that were more feminine and two more masculin...

Valentine's Rinchies!

Image
Howdy! If you're in Greenville, SC, you can relate when I say I am sick and tired of rainy days! Hoping we get some snow tonight but I doubt we will. I always loved seeing the snow when I lived in Virginia and really do miss it. So, to fight some of the rainy day blues, I thought I'd share another quick project I've done recently. These "rinchies" (I know it's not a word LOL) were made for a swap going on at the Fancy Paper Crafters group. These are simply round "inchies". These are primarily used as embellishments on various projects. I collect them ;) (what don't I collect, right?!). Anyway, here's an up close photo of one set of rinchies:     These were so super simple to make. The swap is a Valentine's them which is why I did "love". I used my Cricut to cut everything out. Using my gypsy, I was able to make sure that everything fit properly - so much easier! The bling on each letter are little Swarovski crystals th...

Love Themed Artist Trading Cards

Image
Hello again! Today I thought I'd share a little Artist Trading Card (ATC) that I made for a Valentine's Themed ATC in the Fiskateers craft group. If you've never heard of an ATC, think of it as a crafter's version of a baseball card. It is small in size (3 1/2 inches x 2 1/2 inches) and is intended to show your creativity. Crafters will commonly collect them (which is pretty much what I do) or use them on craft projects like cards or scrapbook layouts. So, without further ado, here's my little creation:     These little cards took quite a while to do, but you know the old saying, "good things come to those who wait" right ;)?! Here are the products I used: - Bazzill Cardstock - Bitter Chocolate and French Vanilla - My Mind's Eye Designer Paper - Be Loved - Lovely Loops, Sweet Hearts and Dearest Dots - Tim Holtz Distress Inks Walnut Stain and Evergreen Bough - Some form of a distressing tool (I like the Heidi Swapp one) - Heartfelt C...

Fun with Stick Pins!

Image
Howdy folks! So, first of all, let me tell ya that me and my camera were not getting along when taking pictures of these little things. Of all the ones I took, these are the best so please bear with me :) (I'm definitely not a professional photographer LOL).   A while back, we did a stick pin swap at Fancy Paper Crafters . I had so much fun making them last time, I wanted to try them again. These are the completed ones from the swaps last year:     After digging through numerous drawers of embellishments for a project I was working on, I gave up trying to find "the perfect one" and made my own! Here's a list of supplies that you'll need (fortunately, all of these are pretty easy to find at any local craft store). - Corsage Pins or White Round Floral Pins   - Copic Marker of your Choosing (I think I used BG23 - Coral Sea ) - Beads of your Choosing (I used Swarovski Crystal Beads and a random antique silver bead I found in my collection) - G...